 |
Mystery tubes
|
Adapted from two versions of this activity:
The Mystery Tube — Author: Aaron Debbink, Partners Investigating Our Environment
Tube Hypothesis and the Nature of Science — Author: Kirk Brown, science
teacher, Tracy High School
A version of this activity also appeared in the National Academy of Science's publication Teaching About Evolution and the Nature of Science.
Overview: This lesson serves as a good introduction to the nature of scientific inquiry. Students are asked to determine what the interior construction of a mystery tube looks like. Working in small groups, students pose explanations (hypotheses) for what they are observing and are asked to test their hypotheses.
Lesson concepts:
- The process of science involves testing ideas about the natural world with data from the natural world.
- The process of science involves observation, exploration, discovery, testing, communication, and application.
- Scientists try to come up with many different natural explanations (i.e., multiple hypotheses) for the patterns they observe.
- Scientists test their ideas using multiple lines of evidence.
- Test results sometimes cause scientists to revise their hypotheses.
- Scientists are creative and curious.
- Scientists work together and share their ideas.
Grade span: 6-16
Materials:
- One Mystery Tube per two students — diagram and supply list below
- Scratch paper for drawing diagrams
- Packets/zip lock bags for building models (see step 5 below). These should contain a variety of items that they might use to build a model: scissors, paper punch, buttons, string, beads, rings, paper clips and also an empty toilet paper roll handed out separately
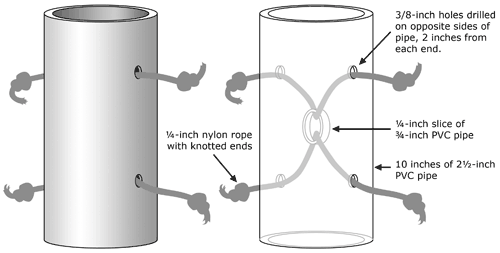
Advance preparation: Make Mystery Tubes as shown below.

For best results, make sure that the two pieces of ropes are of slightly different lengths. It is best to burn the ends of the rope to prevent the knots from coming loose. To cap the ends, use non-transparent tape, so that you can replace worn parts over time.
Time: One class period
Procedure:
- Provide a mystery tube for each pair (or small group) of students. Explain to them that their goal is to determine what the interior construction of the tube looks like. Remind them that they cannot open the tube to look inside.
- Allow sufficient time for groups to work with the mystery tubes. Provide paper on which students can draw all of their ideas as to what the interior of the tube looks like.
Walk around and encourage students to test their ideas and ask how they might do so.
- Once all students feel that they have a "solution," have each group share their findings with the rest of the class. You may have them post their drawings for others to view. This can lead to a form of "peer review" in which students can ask questions of each other.
- Ask students how confident they are that their solution is correct. You may ask them to hold up five fingers for very confident, one finger for not so sure. Ask them what they might do to further test their ideas and to increase that level of confidence. Invariably someone will suggest making a model. This is where the toilet paper rolls come in handy. Hand out a "packet for building a model" to each group of students. Allow sufficient time for students to build their models and to see if they behave the same way that the Mystery Tube does.
- Have students share their models and discuss their effectiveness and how those models either support or refuted their original ideas. Discuss other areas of science in which models are used in a similar way — e.g., the structure of an atom.
Class discussion
- Have students reflect on what they were doing that scientists do. This could be prompted by the question: "Were you doing science?" Discussion should reflect the concepts listed above.
- Ask students how what they were doing is not like science. This will be more difficult for them, but eventually discussion should reveal that in this activity they actually could look inside and know if their answer is correct. In science, we never know if we really have the correct answer.
- Collect the tubes. Do not reveal how the ropes are actually connected!
Extensions:


