 |
Poking around: Having students experience the real process of science |
Author: Mark Stefanski
Overview: In this lesson, students are introduced to the process of scientific inquiry as they develop an approach to determine the shape and size of an unseen object. The activity reinforces the concept that scientists often make indirect observations of the phenomena they are attempting to study. This activity also points out that not all scientists follow the same path in such an investigation.
Lesson concepts:
- The process of science involves observation, exploration, discovery, testing, communication, and application.
- Scientists make indirect observations of the underlying phenomena they are attempting to study.
- Scientific understanding improves as new evidence and perspectives emerge.
- Scientists test their ideas using multiple lines of evidence.
- Test results sometimes cause scientists to revise their hypotheses.
- Scientists are creative and curious.
- Not all scientists approach a problem in the same way.
- Scientists work together and share their ideas.
Grade span: 9-12
Advance preparation of the materials:
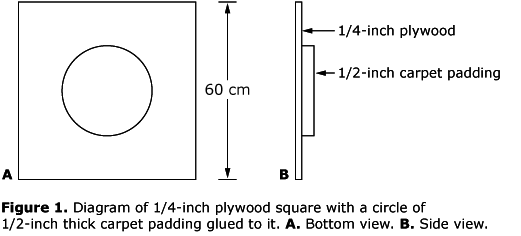
The essential piece of material for this activity is a square piece of 1/4-inch plywood, approximately 60 cm on a side, with a portion of 1/2-inch thick dense foam carpet padding you have glued to the bottom. The piece of carpet padding should be cut into a particular geometric shape, such as a circle, semi-circle, triangle, square, or rectangle. For example, Figure 1 shows the plywood square with a piece of carpet padding in the shape of a circle glued to the bottom. I have obtained the necessary carpet padding at a local carpet remnant store at very low cost.
The number of these plywood/carpet padding assemblies you will need to construct depends on the size of your class. The exercise works fine with students operating in teams of four, so for a class of 28, you will need seven assemblies. It is desirable to glue a variety of different geometric shapes to the pieces of plywood so that each team's object of inquiry is slightly different.
The only other materials that students need are one or two meter sticks per team, a few feet of kite string, paper and pencil. Toward the end of the exercise, have one paper (or acetate) copy of the simplified flow chart of How science works for each team.
Time: One to two class periods
Grouping: Groups of four
Teaching tips: A note from the author — I have found a low-cost activity that is effective in getting high school students to think about how scientists go about making approximations of the nature of things. I have adopted this lesson from a cross-county colleague of mine, who regretfully has forgotten exactly where he picked up the activity. Within the procedures below, I have added personal notations (shown in italics) that I hope you will find useful.
Procedure:
- While the students are out of the room (or sufficiently distracted), lay the plywood pieces on the floor as distantly spaced apart as possible, making sure that the students do not see the shapes glued to the bottoms. Assign each team of four students to one of the plywood pieces.
Announce the one essential rule for this activity: You cannot lift the plywood board from the floor, directly or indirectly.
- Ask the students to take a couple of minutes to list the questions about the plywood piece in front of them. Obviously, the central question the students will have is "What's under the plywood?" Some students may need some prompting to ask more specific questions, like: What is the shape of the object under the board? How big is it? What is it made out of? Is it somehow fixed to the bottom of the board, or not? List the questions that the groups come up with on the board.
Note: When confronted with the question, "Why are we doing this?," rather than dismiss the question, I acknowledge it as a fair one, and explain that I will be curious how the students themselves will answer that question after the activity.
Looking at the list, ask which of the questions the students would want to tackle first. Some will stick with "What's under the board?" Acknowledge that it's understandable that they would want to settle the matter straight away, and, if need be, lead them in a discussion that has them identify the first steps that will help them on a path to reaching this goal. Point out (or more likely affirm) for the students that if they determine the size and shape of the object, then they will be moving in a useful direction toward determining exactly what the object is.
- Ask the students to work within their groups to come up with some ideas about how to go about determining the shape and size of the object under the plywood (repeat the rule about not being able to lift the plywood from the floor, directly or indirectly).
Most students will come up with poking at the object with some kind of long, thin stick, like a meter stick. Others might come up with using a length of string that could be stretched along the sides of what ever is underneath; some may think of using a soft substance, like clay or Play Doh to push up against the object to create a mold of whatever lies underneath. Allow the groups to report their ideas to the rest of the class, and write these on the board.
- Acknowledging that there are several ways in which the students might proceed, announce that the tools available in the classroom at the moment are a set of meter sticks and some lengths of string. Instruct the students that the task that they have identified for themselves is to determine the shape and size of the object under the plywood.
Note: When the assembly is placed on the floor, the thickness of the carpet padding provides just enough space for a conventional meter stick to be manipulated back and forth under the plywood. A conventional width of kite string obviously can be stretched underneath too.
- Allow the students 15 to 30 minutes to make their initial determinations. The time they will need to work through their determinations depends on the age and ability of the students.
Note: The best way in which to use the meter stick is, of course, to poke under the plywood from as many angles as possible in order to measure the distance from the edge of the plywood to the edge of the carpet padding. Yet, as you might imagine, for many students this is not obvious. By the same token, I have witnessed some teams be as creative as to eventually construct a grid on a piece of paper to help record their findings. Some produce a drawing of what they think is underneath the plywood, and some do not. As might be expected, if students are not experienced in working together in teams, the task of determining the shape and its dimensions can be quite challenging indeed.
- Have members of each team sit together and review their findings. Instruct the students that at this point they have some options. They can continue to work together within their group, or they can consult with teams working with different pieces of plywood. Instruct the students that if they choose to consult with other teams, it is best to be prepared to provide the other group with a clear description of the methods they have employed and a clear description of the data they have collected thus far (obviously, a drawing of what they hypothesize to be under the plywood will be helpful to communicate their findings, but it is best to allow the students to determine this for themselves).
Most groups will be interested in seeing what other teams have come up with and consulting with them (but some may not!). If all teams choose to work this way, then you can organize the sharing session by assigning pairs to take turns reporting to one another and posing questions. Note that if the sizes and shapes under the plywood differ, the emphasis in consulting other groups will become focused on the process of making the determination rather than the determination itself.
- After this initial round of sharing (or not), instruct the students that they have a limited amount of time remaining to make their determinations (perhaps another 15 or 20 minutes). Tell each group that they are free to work solely within their group, or they are free to consult with others. Perhaps some groups will divide the tasks among individual members. After this time is up, you play a key role in the activity: without allowing the students to turn over the plywood, collect the assemblies and place them back in a storage cabinet or closet so that the students do not ever directly observe the shapes on the bottoms.
Analysis
- Because the process that each team goes through in making their determination is in itself very illuminating and central to this exercise, have each group take a moment to reflect on the steps they have taken on making their provisional determination and make a list of these in bulleted points. In order to get them started with their lists, remind them that the first step was that they observed the plywood and the second was for everyone to pose a list of questions about the piece of plywood.
- Once they have a list of steps, have them number the items in the list.
- Next, hand out a copy of the simplified version of the flowchart to each group, and have them write the number of each step in the most appropriate circle (Exploration and Discovery, Testing Ideas, Community Analysis and Feedback, or Outcomes and Benefits). Then have them connect the numbers as a way of visualizing their process.
- As one way of sharing these results, take one of the group's results (perhaps the group that completes the task first), and have them copy the results of their flow chart on an overhead. This overhead can then be used as a basis of comparison with other groups in the class. Alternatively, all groups can trace their process on an acetate sheet depicting the flow chart, and one by one, they can be compared.
- In addition to showing their flowcharts, it is worthwhile to have each team make a short oral presentation to the rest of the class describing the way in which they obtained their results. It is especially instructive to pose the question to each team, "How certain are you of the shape and dimensions of the object under the plywood?" There might be some high level degrees of confidence for some teams, but without actually seeing the object directly, there can be no absolute certainty.
An additional way of reporting the results would be for each team, (or perhaps individual students) to write a description of the findings, again emphasizing the process that led to their conclusions. An additional question to pose at this point might be, "After further reflection, what other methods might you use to attempt to determine the shape and dimensions of the object under the plywood?"
What to reinforce: Scientists spend a lot of time "poking around," making indirect observations of the underlying phenomena they are attempting to study. One obvious example is that of scientists attempting to determine the nature of the atom, examining these fundamental units of matter in a number of indirect ways, attempting to gain the clearest possible picture of their nature. Are we ever going to directly observe an individual atom in its entirety, with every structural detail exposed? Of course not. But we can always attempt to find a new and more clever way of poking around at atoms to gain a clearer picture of them than we had before.
This activity also points out that not all scientists follow exactly the same path in doing their work. This is important to emphasize and it is also one of the things that makes science so challenging, exciting, and fun.
Of course, the metaphor of scientists "poking around" is not limited to the study of extremely small objects. In my biology classes, for example, I have begun to use the metaphor throughout the year, invoking it as we perform investigations of everything from enzyme activity to animal behavior and evolution. Our understanding of any facet of science involves, by its very nature, at least some degree of uncertainty.
Students may not be comfortable at first with the idea that science is not a linear process, especially if they previously have been taught otherwise. And students tend to be somewhat uncomfortable with the notion of uncertainty at first, and this is especially true if they have been given the mistaken idea in previous experiences that the goal of science is to somehow "prove" things. This makes it all the more important to provide students with opportunities to discover that it is okay not to be absolutely certain, and that all of us, including scientists, have to cope with some degree of ambiguity in our lives.
There is another advantage of taking away the plywood assemblies as part of the lesson: it will have the kids howling for you to show them what was hidden on the bottoms. As the old show business maxim aptly puts it, you always want to leave your audience asking for more.